Wi-Fi Expander
Getting Set Up
Read the PDF version here: Wi-Fi Quick Start
Connect to MetaModule
- Power off your system.
- Connect one end of the included 8-pin cable to the header labeled "WiFi" on the MetaModule, and the other end to the 8-pin header on the Wi-Fi Expander.
- Make sure the red stripe is up on both ends of the cable.
- Connect the included 10-pin power cable to Eurorack power with the red stripe down.
- Power on your case. The Wi-Fi Expander button will turn light blue.
Connecting to a Wi-Fi network (Provisioning)
-
1. Download the ESP BLE Provisioning app on a phone or tablet
- iOS: App Store
- Android: Google Play Store
![]()
-
2. Open the ESP BLE Provisioning app
At some point the app will ask for permission to use the camera and/or Bluetooth. Click "OK" or "Allow".
If you do not allow access to the camera and Bluetooth, then you MUST go to your iOS or Android Settings and allow access.
-
3. Tap the gear icon (upper-left) on iOS or the three dots (upper-right) on Android
This will open the settings page.

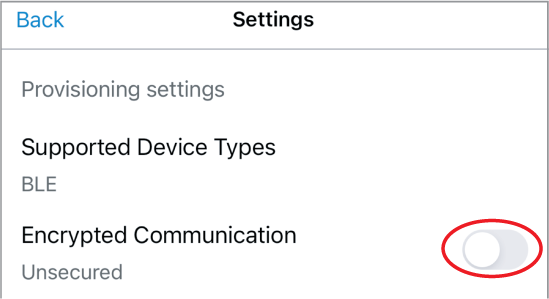
- 4. Turn off Encrypted Communication
- 5. Tap "Provision Device"

- 6. Tap "I don't have a QR code"

-
7. In the PREFIX box, remove the text “PROV_” (if present), and type “4MS”
On Android, tap “Change” first.

-
8. Tap the Refresh icon or “Scan Again”
Then tap the 4MS device that appears

-
9. Select your Wi-Fi network from the list
Enter your Wi-Fi password when asked.
After a moment, the light on the Wi-Fi Expander will turn green.
-
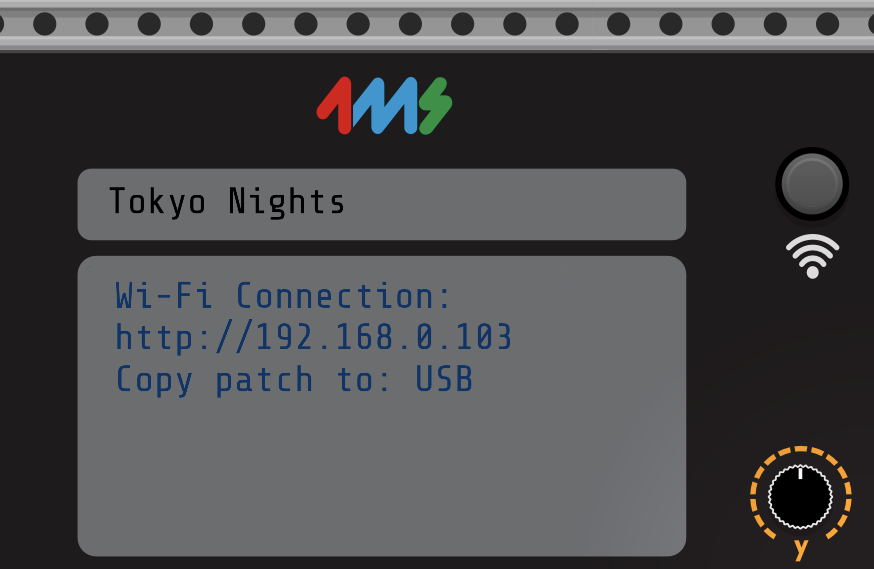
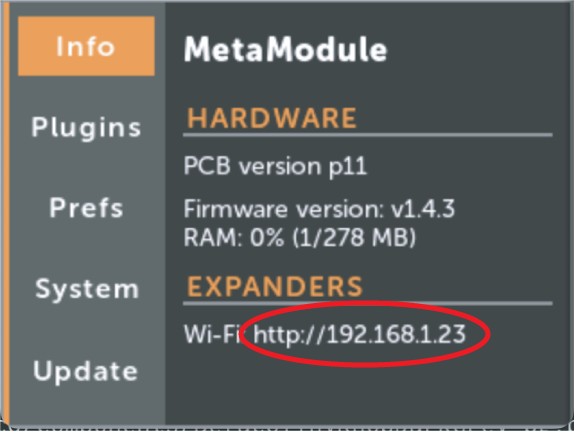
10. On the MetaModule, go to
Settings > InfoLook for the Wi-Fi IP address
-
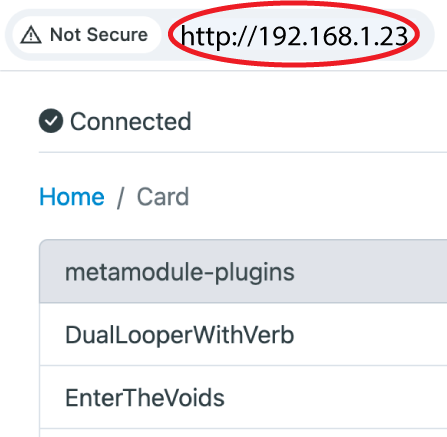
11. On your computer, open a browser window and type in the IP address
Hint: the IP address starts with
http://, not withhttps://
-
You're connected!
In the browser, navigate to the drive (and optionally, a subfolder) where you want to put a patch.
Click the Upload button and select a
.ymlpatch file to transfer, or drag and drop it.When the progress bar is complete, the patch file can be played on your MetaModule!
After connecting to a Wi-Fi network, you can choose to delete the ESP BLE Provisioning app. However, if you anticipate needing to change Wi-Fi networks, you may want to leave it installed.
Using the Wi-Fi Expander with VCV Rack
-
1. Install the 4ms plugin for VCV Rack, version 2.0.9 or later
Update or install from the VCV Rack Library
-
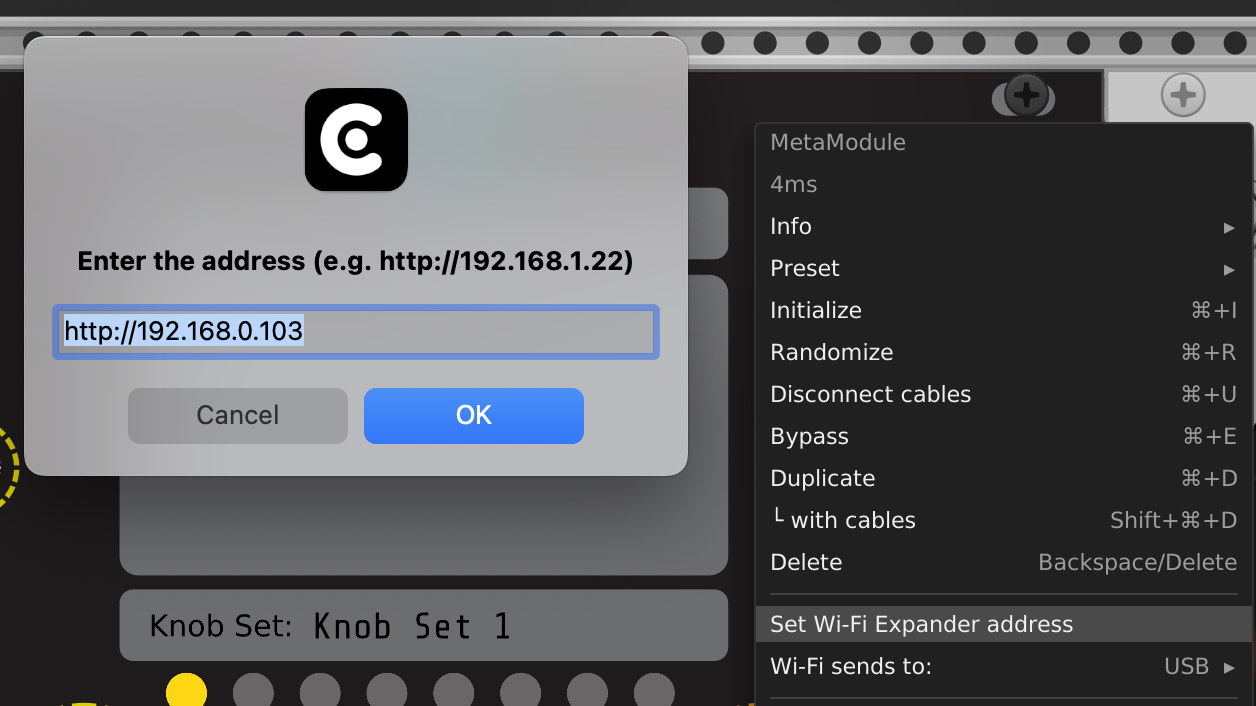
2. Enter the Wi-Fi Expander's address into the VCV Rack MetaModule hub
Right-click on the MetaModule panel.
From the menu, select "Set Wi-Fi Expander address".
Enter the address you found by going to Settings > Info on the MetaModule (see above).
-
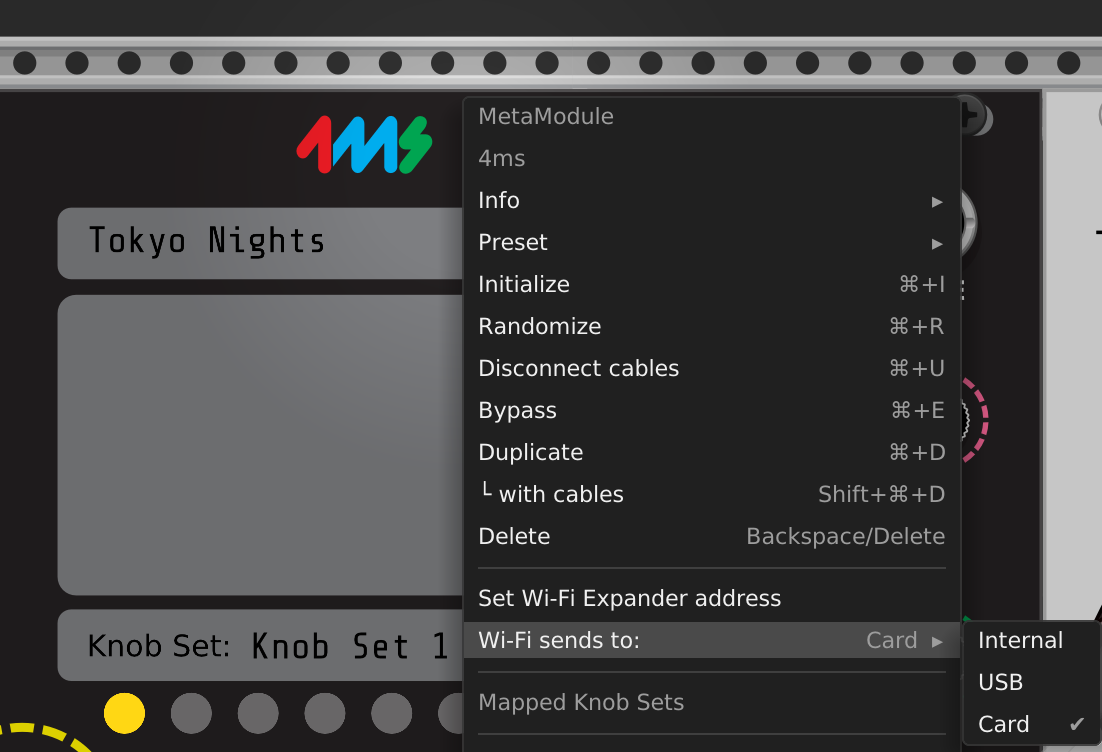
3. Select the volume you want to transfer to
Right-click on the MetaModule in VCV Rack and choose a volume from the "Wi-Fi sends to:" submenu.
Note that the Internal drive has very limited space (2 MB max), so it's recommended to store patches on USB or Card if possible.
Note: sending to sub-folders is not yet supported. Use a web browser if you
need to do that.
-
4. Click the Wi-Fi button to transfer a patch
If you hover the cursor over the button, the Wi-Fi settings will display in the main text box.
After clicking, the top text box will display "Sent patch file" or "Failed to send patch".
Changing Wi-Fi networks or Resetting the Wi-Fi Expander
Power on with the button held down. Release it when it turns red. The light will turn off and then turn light blue. You can then perform the steps at the top of this page.
Light Colors
The Wi-Fi Expander shows its status with a colored button light:
-
Red: The Expander has not been told what Wi-Fi network to connect to, or there is an internal error. Reset the Wi-Fi Expander (see above section).
-
Light Blue: The Expander cannot find the Wi-Fi network. Check if other devices can see the network, and that the signal strength is high where the Wi-Fi Expander is mounted. Make sure there is a clear line-of-sight from the Wi-Fi Expander to the Wi-Fi router.
-
Green: The Expander is connected to a Wi-Fi network.
Updating Wi-Fi Expander Firmware
The Wi-Fi Expander firmware will be updated whenever you update the MetaModule firmware and a Wi-Fi Expander is connected via the 8-pin cable.
All MetaModule firmware releases starting with v1.4 contain the Wi-Fi Expander firmware. If you do not have the Wi-Fi Expander connected when you update the MetaModule firmware, then the updater will skip the Wi-Fi Expander updates and just update the MetaModule.
Wi-Fi Expander Troubleshooting
-
Cannot get the ESP BLE Provisioning app to see the Wi-Fi Expander module
-
Did you disable Secure Communication in the app settings?
-
Did you erase the prefix text "PROV" and replace it with "4MS"?
-
Did you give the app permission to use the camera? Even though the Wi-Fi Expander doesn't have a QR code, the app will still not function unless you give it permission to use the camera.
-
Did you give the app permission to use Bluetooth? Go to your phone's settings and verify it has Bluetooth and camera permissions
-
Try resetting the Wi-Fi Expander by holding down the button while powering on. Release the button when it turns red. Re-provision the Wi-Fi Expander by following the steps at the top of this page.
-
-
Cannot see my hotspot in the list of Wi-Fi networks
-
If you are creating a personal Wi-Fi network (aka "hotspot"), then it's possible you will need to run the ESP BLE Provisioning app on a different device. The app may not be able to see the hotspot network created on the same device that it's running on.
-
Make sure you are trying to connect to a 2.4GHz network. Networks that are 5GHz will not work with the Wi-Fi Expander.
-
-
Cannot send a patch over Wi-Fi using VCV Rack
-
Verify the IP address is correct: compare it carefully with what's displayed on the MetaModule Settings > Info page. Don't forget to type the "http://" at the start.
-
Try typing the IP address into a browser to make sure you have the right address
-
Your computer has to be on the same Wi-Fi network as the MetaModule Wi-Fi Expander.
-
Are you trying to transfer to a volume (Card or USB) that's not inserted into the MetaModule? Go to
Load Patchon the MetaModule and make sure the volume you're trying to transfer to is actually detected. -
If you are transferring to the Internal drive, it's possible you ran out of space. Delete some patches.
-
There is a limit of 1MB for patch files transferred to USB or Card, and 256kB for the Internal drive. Most modules store very little (only a few bytes, if anything) but some modules store 64kB or more. Try saving the .yml patch file to your computer and then looking at how large it is.
-
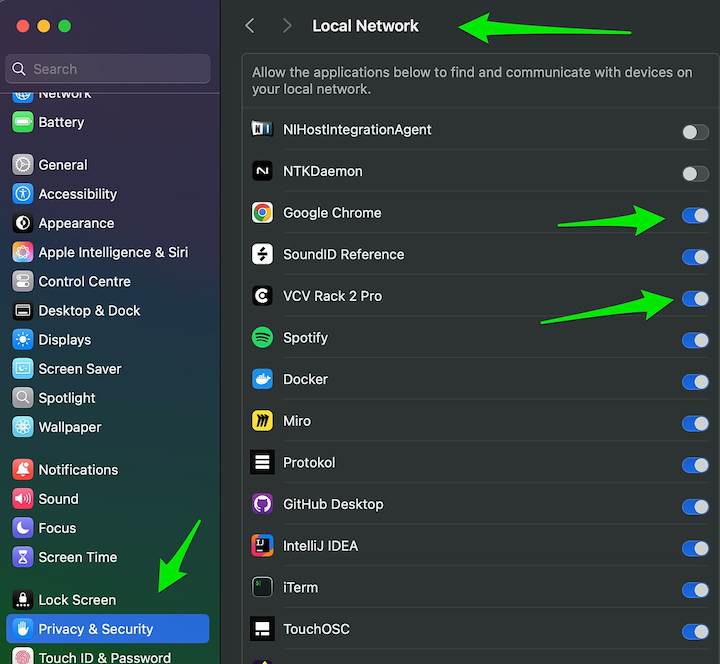
Check your system permissions and see if VCV Rack has permission to access the local network. For MacOS 15, it's in the System Preferences > Privacy&Security > Local Network > VCV Rack (and your preferred web browser):
-
-
My browser won't load the Wi-Fi Expander's page
-
Your computer must be on the same network as the Wi-Fi expander. Make sure whatever Wi-Fi network you entered into the ESP BLE app is the same as the network your computer is connected to.
-
Check the Wi-Fi Expander's light is green. If it's blue or red, then the Wi-Fi Expander is not connected to the network.
-
Check your system permissions and see if your web browser has permission to access the local network. See image above for an example in MacOS 15.
-
Eject the USB drive and/or microSD card and refresh the browser. If it connects now, then the issue may be that one of your disks contains too many files and the directory transfer is stalling out on the network. This is a known issue and the workaround is to reduce the number of files on all mounted disks.
-
-
I don't have a Wi-Fi button on my VCV Rack MetaModule hub
-
You need to install the 4ms plugin for VCV Rack v2.0.9 or later
-
Make sure to quit and re-open VCV Rack after upgrading.
-
-
Other problems
-
Make sure you are using the latest MetaModule firmware and Wi-Fi Expander firmware. Updating the MetaModule firmware while the Wi-Fi Expander is connected via the 8-pin cable will update both the MetaModule and the Wi-Fi Expander.
-
Use the latest version of the 4ms VCV Rack plugin.
-

